728x90
반응형
심층신경망_훈련
라이브러리 정의
import tensorflow as tf
from tensorflow import keras
from sklearn.model_selection import train_test_split
''' 실행 결과를 동일하게 하기 위한 처리(완전 동일하지 않을 수도 있음) '''
tf.keras.utils.set_random_seed(42)

''' 연산 고정 '''
tf.config.experimental.enable_op_determinism()
데이터 정의
'''
 - 패션MNIST 데이터 읽어들이기 (훈련 및 테스트 데이터)
 - 정규화 하기
 - 훈련 및 검증 데이터로 분류하기
'''

''' 패션MNIST 데이터 읽어들이기 '''
(train_input, train_target), (test_input, test_target) = keras.datasets.fashion_mnist.load_data()
''' 정규화 '''
train_scaled_255 = train_input / 255.0
test_scaled_255 = test_input / 255.0

''' 훈련 및 검증 데이터로 분류하기 '''
train_scaled, val_scaled, train_target, val_target = train_test_split(train_scaled_255,
                                                                      train_target,
                                                                      test_size=0.2,
                                                                      random_state=42)
print(train_scaled.shape, train_target.shape)
print(val_scaled.shape, val_target.shape)
print(test_scaled_2d.shape, test_target.shape)
심층신경망(Deep Neural Network, DNN)
- 인공신경망(Artificial Neural Networt, ANN) : 계층이 1개인 경우 또는 은닉계층이 없는 경우
- 심층신경망(Deep Neural Network, DNN) : 은닉계층을 가지고 있는 경우
모델 생성시키는 함수 생성하기
- 함수이름 : model_fn
→ 매개변수 : a_layer 매개변수
→ 은닉계층이 있는 경우 계층자체를 매개변수로 받아서 아래에서 추가
- 모델생성
- 입력층(1차원 전처리계층) 추가
- 100개의 출력을 담당하는 은닉계층 추가, 활성화 함수 "relu"
- 추가할 은닉계층이 있으면 추가, 없으면(None) 건너뛰기
- 출력층
- 모델 반환
- 함수 생성
def model_fn(a_layer = None):
    model = keras.Sequential()

    model.add(keras.layers.Flatten(28, 28))
    model.add(keras.layers.Dense(100, activation='relu'))

    ''' 추가할 은닉계층이 있는 경우만 실행 '''
    if a_layer :
        model.add(a_layer)

    model.add(keras.layers.Dense(10, activation='softmax'))

return model- 함수 호출
model5 = model_fn()
model5- 모델 생성계층 확인하기
model5.summary()
Param = (입력크기 * 출력크기) + 출력크기
78500 = (784 * 100) + 100
1010 = (100 * 10) + 10
모델 설정하기(Compile)
model5.compile(loss = "sparse_categorical_crossentropy",
              metrics="accuracy")
모델 훈련하기(Fit)
model5.fit(train_scaled, train_target, epochs=5)
- 훈련 출력방법 지정
- verbose 출력방법
→ 0은 아무것도 안나옴
→ 1은 프로그래스바와 함께 loss와 accuracy 출력
→ 2는 프로그래스바와 없이 loss와 accuracy만 출력
→ 기본값은 1
history5 = model5.fit(train_scaled, train_target, epochs=5, verbose=2)
print("훈련 끝 >>>>>>>")

시각화 하기
''' 시각화 하기 '''
import matplotlib.pyplot as plt

plt.title("Epoch5 - Loss")
plt.plot(history5.epoch, history5.history["loss"])
plt.xlabel("epoch")
plt.ylabel("loss")
plt.grid()

plt.savefig("./saveFig/Epoch5-Loss.png")
plt.show()
plt.title("Epoch5 - Accuracy")
plt.plot(history5.epoch, history5.history["accuracy"])
plt.xlabel("epoch")
plt.ylabel("accuracy")
plt.grid()

plt.savefig("./saveFig/Epoch5-Accuracy.png")
plt.show()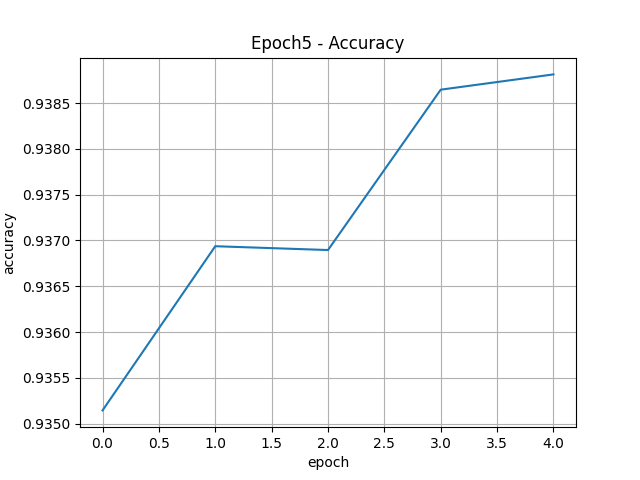
728x90
반응형
'Digital Boot > 인공지능' 카테고리의 다른 글
| [인공지능][DL] Deep Learning 실습 - DNN 분류데이터 사용 (1) | 2024.01.05 |
|---|---|
| [인공지능][DL] Deep Learning - 심층신경망 훈련 및 성능향상 (2) (2) | 2024.01.04 |
| [인공지능][DL] Deep Learning 실습 - 신경망계층 추가방법 및 성능향상방법 (1) | 2024.01.03 |
| [인공지능][DL] Deep Learning - 신경망계층 추가방법 및 성능향상방법 (1) | 2024.01.03 |
| [인공지능][DL] Deep Learning - Tensorflow / 인공신경망 (0) | 2023.12.29 |